With texture painting on Blender, there are a few steps to take before pulling out that pain brush and painting your model.
Also, the complexity of texture painting will also depend on the complexity of your model. So in this mini guide I opt to demonstrate these steps using a very basic model such as a cube.
The assumption here is that if you are a decent to good modeller, then you likely know how to texture paint. In essence, this is a starting guide and using a basic model will likely get the message across which you can then replicate on more complex shapes and geometry.
What Is Blender Texture Paint?
As the name suggests, [highlight-it color-1]Blender’s texture paint is a built-in paint feature designed to physically paint over your UV textures, which then transposes onto your model[/highlight-it]. Alternatively, you can physically paint over your model which then transposes over your UV textures.
Of course, there is an other option, where you can download your UV texture and edit that externally using photo editing tools like Photoshop or Gimp, and then re-upload to your 3D model.
In essence, we’re physically adding the texture, shadows and colors onto the model, so the render engine uses that data to generate the render. This is very much different to other means of rendering where you incorporate external factors to your scene, such as different lightings, materials and even HDRI backgrounds to replicate real-world conditions.
So without further ado, let’s take a look at the steps we shall be covering in this texture painting tutorial.
- Step 1: UV unwrapping your model
- Step 2: Accessing Blender’s texture painting panel
- Step 3: Adding a base color (a little like a primer coat before painting)
- Step 4: Choosing different brush and paint types
- Step 5: Painting directly on your model
Blender Secrets E-book
How To Use Blender Texture Paint?
So let’s get started with the step-by-step guide… remember we’ll be using a simple cube for demonstrational purposes.
Step 1: UV Unwrapping Your Blender Model
Load up Blender and conveniently the default cube shows up.
Go into ‘Edit Mode’ by left clicking the cube and then choosing ‘Edit Mode’ at the top menu.

In the newer version of Blender (2.92.0) the cube will already be highlighted in orange. If not highlighted in orange, simply hit the ‘A’ key on the keyboard to highlight it.

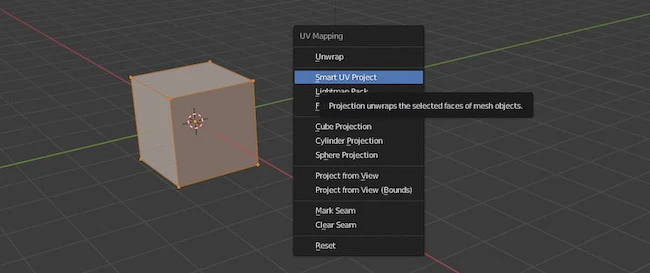
Now we want to UV unwrap the model, which is essentially the process of turning your 3D model and flattening it into 2D sections.
To do this, while in ‘Edit Mode’ (and model highlighted in orange), simply hit ‘U’ on your keyboard and then click ‘Smart UV Project’ from the menu.
Step 2: Accessing Blender’s Texture Paint Panel
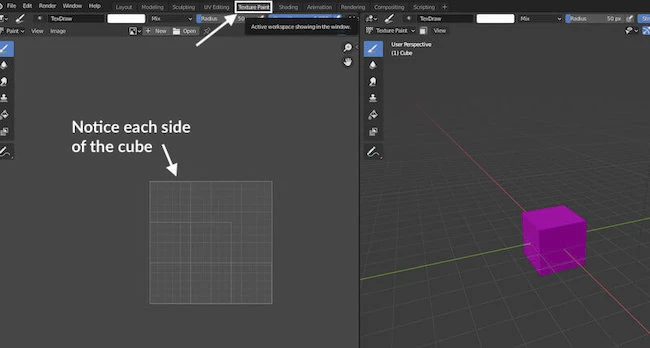
At this point it would appear nothing happened, but you will now need to click the ‘Texture Paint’ tab on the top menu to see the texture paint panel AND your model in flat pack!
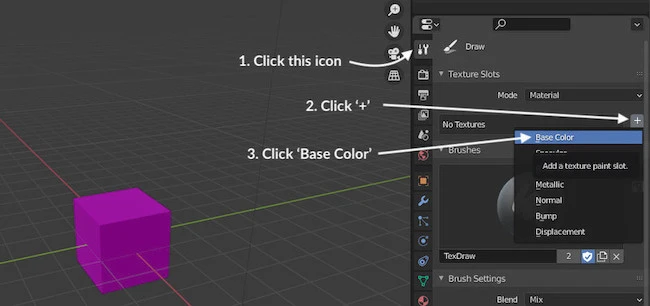
Step 3: How To Add A Base Color (like a primer coat before painting)
Notice above how your model has turned purple?
That means it has no texture to paint on. So at it stands we cannot paint anything on our model until we add a base color.
To do this, click on the ‘texture draw’ tab, then the ‘+’ button and finally select ‘Base Color‘ from the drop down list!
You’ve finally added a base color and your model should have turned grey!
Step 4: Choosing Different Brushes & Paint Types
What we are going to do is select a color from the color wheel (in this case blue) and then move our cursor (which is now a circle) over our model and start painting it but left clicking the mouse button and holding it down.
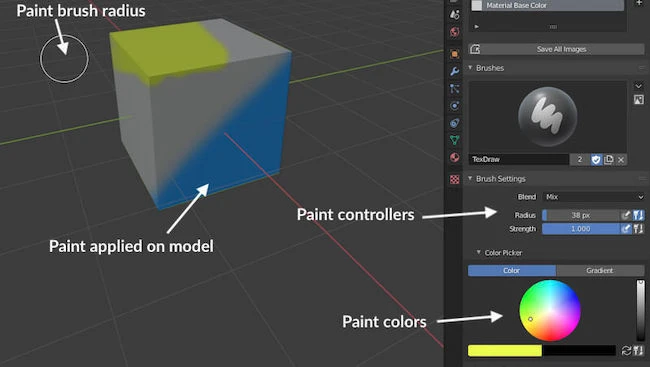
Note: The cursor circle (aka brush stroke diameter) can be increased or decreased in size using ‘[‘ or ‘]’ keys on your keyboard.
Step 5: Seeing Your Paint On UV Unwrap
One thing your might notice is that while painting your model, you will not see the paint show up on your UV unwrap.
That’s because you need to change one setting and everything is sorted.
Simply click the arrow pointing downwards and select ‘Material Base Color’ from the drop down menu.
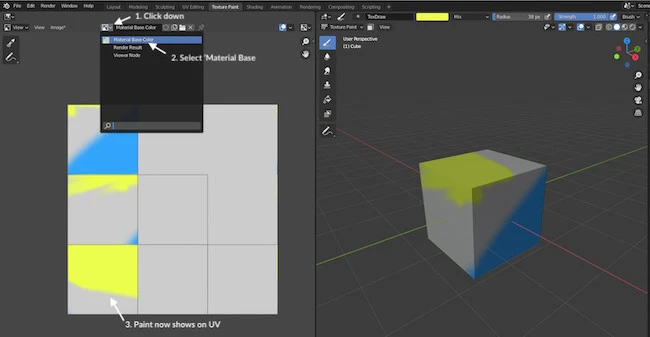
Note: Now while you continuing drawing on your model, you will see your UV unwrap update in real time
You are done!
Texture Paint Brushes
By default, there is only one brush type on Blender, which limits the type of stroke you may want to paint on your model. It looks like this:
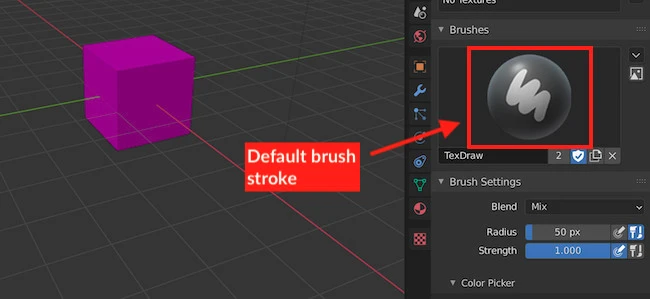
It’s possible to customize your own paint brush stroke. However, why do that when you can use a photo editing tool such as GIMP that already has an array of predefined brushes at hand?
In Step 2, we have UV unwrapped the model. This essentially breaks the model down into a flat pack. In the case of a 3D cube, the model has been broken down into 6 squares and laid down flat.
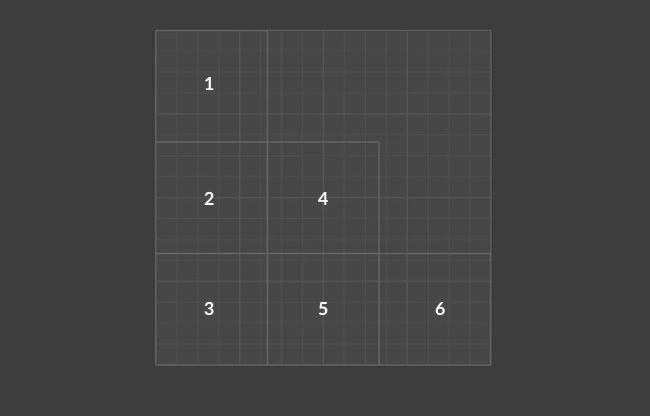
Export the flat pack (unwrapped map) and then import into GIMP. From there simply paint your texture using the array of brushes available.
Once completed, import it back into Blender and all your work will reflect onto your 3D model.
Blender Texture Paint Not Working
A common complaint by Blender users is the texture paint feature often not working. As far as I can tell, there is no bug or issue with the feature itself and it’s often the user not following the instructions properly.
I believe the biggest culprit is forgetting to set the model to “Base Color”. Miss this step and you’ll not be able to paint on the model, giving the impression the feature is broken and not working.
For a better understanding, go to Step 3 in the instructions above.
Closing Thoughts On Texture Painting
This is yet an other powerful feature that Blender has on offer. And as you may have guessed, this skill is vitally important for the making of games in the gaming industry.
The primary advantage of texture paining is it allows for the creation of highly detailed models that are made up of low polygon count.
Essentially, the texture design can be detailed enough to hide the fact the model has a low polygon count. Low polygon count models allow for faster render times and nicer texture designs provide a better gaming experience.
FAQ
Is Blender good for texture painting?
Blender has a built-in feature called Texture Paint that allows you to either paint directly on your model, or on the UV unwrapped (flat pack) version of the model. Work on one and the other automatically updates!
However, photo-editing tools such as GIMP provide more flexibility when it comes to texture creations and have an abundance of brush strokes. Your flat pack version of your model can be important onto GIMP, worked on, and then reintroduced into Blender.
Can I get free textures for Blender?
Sure, there are many places that provide free textures that can be used on your scene. Note, that these textures aren’t just limited for Blender users, they can also be used for other 3D modelling packages. Here are some recommendations:
1. Texturer.com
2. Ambientcg.com
3. 3dxo.com
4. Polyhaven.com