Having an understanding of parts before buying a 3d printer will ultimately result in achieving better quality printed models.
However, understanding the finer details of what each component does is priceless. Knowing the parts of a 3d printer can help you:
- Achieve better quality prints
- Fine tune printing speeds
- Maintain your printer for greater longevity
- Upgrade & modify parts where needed
For simplicity sake, we will be using a typical FDM printer for demonstration purposes:

Other printer technologies work differently and can be more complicated, however, the “general” idea is the same.
Besides, if this is the first time wanting to learn about 3D printers, then you would likely want to purchase FDM technology before moving up in complexity.
Note: Here is an article on the differences between FDM & SLA printers technology. Both methods use additive manufacturing, but in very different ways.
Components That Make Up Your 3D Desktop Printer
You’ll want to familiarize yourself with the list of components that make up the functioning parts of your potential 3D printer.
By familiarizing yourself with the performance of each part, you’re half way to buying the printer that suits your requirements. Better yet, when your printer starts having problems, you’ll instinctively know where to look and troubleshoot for solutions, which reduces down-time in the long run.
Let’s look at the main list of 3d printer machine parts and factors to consider before making your purchase.
Support Frame
Let’s start of with the frame. Without the foundations, we could not fix in place any of the other parts that make up the 3D printer.
The frame is essentially the chassis that holds all the other components together. It is also responsible for the stability of the machine and the durability, depending on which material is used.
3D printer frames can be made from:
- Metal
- Acrylic
- Wood (older frame design)
More expensive and sophisticated machines can come with an enclosure that protects from dust particles and other forms of debris. They can even save a wondering finger from injury too!
Enclosures also provide an other benefit; a type of climate control, which is great for certain filament materials that require a more stable and consistent temperature.
Build Volume For Print Size
The build volume is sometimes called “build area”. However, volume is more accurate as it’s an indication of the maxim size of a 3D object you can print.
For example, the image below is of the LulzBot TAZ 6, it’s build volume is 280mm x 280mm x 250mm (x,y,z), which is close to the volume of a basket ball.
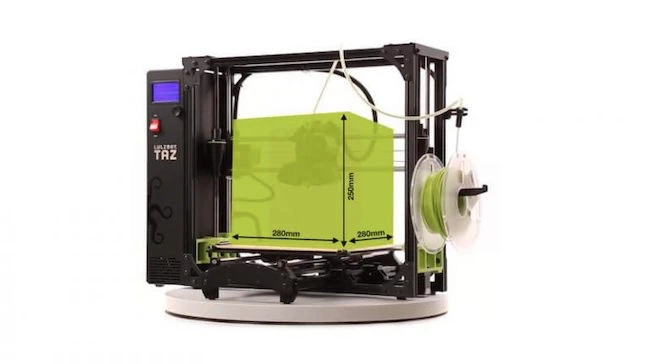
You can see the build volume indicated in green, which means your printed object cannot be printed any bigger than this volume.
Therefore, it’s important to get an idea of how big you want your prints to be before deciding which machine to buy.
Filament Diameter
There are two “standard” diameters of filament that can be used for FDM printers, these are 1.75mm & 3mm diameters.
This will depend on the printer you get (which extruder & hot end it has). However, as a general rule (there are expection), Bowden extruders work best with 1.75mm diameters and printers with Direct drive usually work best with 3mm diameters.
1.75mm or 3mm Filament Diameter?
So which diameter of filament should you go for? If you’re expecting a definitive answer, then you are going to be greatly disappointed as it depends on your requirements.
However, based on the current market, the 1.75mm gets a slight edge over the 3mm for the following reasons:
- They are a little easier to get, which in turn dictates the “standard”
- They allow for finer control due to the smaller diameter
- They require less force to extrude (forcing 1.75mm of plastic through a 3mm end takes less effort than its fatter counterpart)
Having said that, the overall advantages are fairly minor and normally there is no reason to replace a functional 3mm extruder for a 1.75mm.
Let’s dive in a little deeper on the advantages and disadvantages of filament diamters based on what several 3D printer enthusiasts say on Stack Exchange [R] and break it down into bite sized chunks.
✓ Advantages of using a 1.75mm diameter filament
- More popular, easier to buy
- Smaller extruder required compared to 3mm
- Easier to use with bowden tube
- Smaller nozzle diameter (<0.4mm) can be used for precise prints
- Better flow rate flexibility due to higher surface to volume ratio, allowing for faster melting in nozzle and higher volume extrusion rates
✕ Disadvantages of using a 1.75mm diameter filament
- The smaller the diameter means manufacturing tolerances need to be tighter along the length of the filament.
- 1.75mm filaments have a higher surface-to-volume ratio. Therefore, they can suffer more from water retention.
✓ Advantages of using a 3mm diameter filament
- Easier to print with flexible plastics
- Print quality less affected by changes in filament diameter
- Faster extrusions
- Better control & higher extrusion rates on wider nozzle diameters
- Spits out more plastic at once, can build much taller prints quicker
✕ Disadvantages of using a 3mm diameter filament
- High tension when spool about to end, making last couple of meters unusable (wasted added cost)
FDM Extruder Types
For FDM there are two extruder types, the Bowden extruder & Direct Drive extruder. This component, by means of a motor, feeds the filament to the hot end ready for melting.
Bowden Extruder
The motor on Bowden extruders are located away from the hot end which reduces the weight of moving parts. This allows for more accurate prints as momentum is greatly reduced, particularly at higher speeds (less momentum to overcome during instant changes in direction).
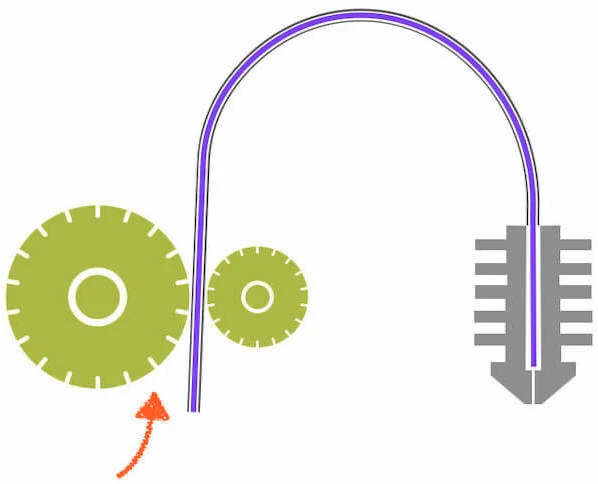
In theory, this means that Bowdens should print faster, but like everything, there are other factors to consider that affects print speed.
Bowdens come with challenges too. The filament is fed through a hollow tube (a guide) which can cause problems too. For example, consider having your feeder tension too high, pieces of your filament can get grounded up into tiny dust particals and collect inside the tube which in turn creates friction.
This friction can essentially slow down the forward movement of the material and ultimately cause under extrusion problems. These dust particals can also enter the hot end causing blockages.
✓ Pros of Using Bowden Technology
- Small compact print heads allow for greater build volumes (bigger prints)
- Being mounted on the frame (not print head) allows for smoother movement and better control
✕ Cons of Using Bowden Technology
- Smaller material range, as you need stiffer plastics to feed through tube
- Heavier duty motor needed to push filament through (more expensive)
- Decreased response time due to friction in the tube. Bowden extruders require longer and faster retractions to avoid stringing.
Direct Extruder
For direct feeders, the extruder pushes the filament directly into the nozzle as it is located directly above the hot end.
This method has its advantages, especially related to direct printing. The closer location of the extruder to the hot end means the motor has far more control over what it can do with the filament.
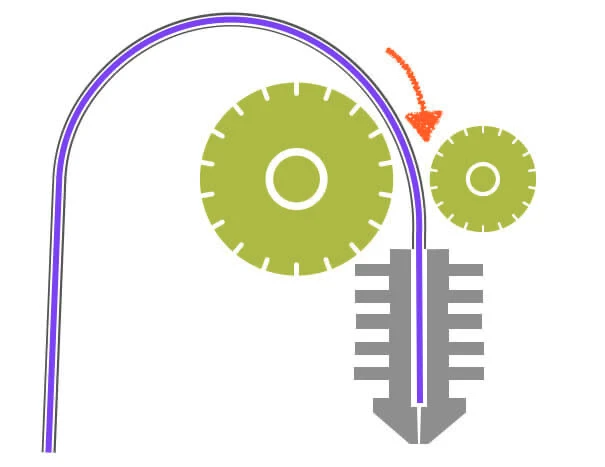
It is a combination of pulling the filament at close proximity (as opposed to pushing it over a long distance) that enables this control that should in theory produce more accurate prints. However, there are also downsides that can counter act the possitives which we discuss below:
✓ Pros of Using Direct Drive Technology
- Less power required, meaning a less expensive motor
- Compatible with a larger range of filaments due to shorter travel
- Better extrusion control as the extruder is mounted close to print head and can easily push filament through nozzle
- Faster retraction in between travel stage, reduction in oozing or stringing issues
✕ Cons of Using Direct Drive Technology
- Burdened movements due to extruder mounted above hot end. Parts need to overcome momentum causing wobble & loss of print accuracy
Hot End
This hotend is a component of a 3D printer that has a simple but important job: to melt the filament (plastic) at a consistent temperature in order to print 3D models accurately.
Important Factors To Consider When Purchasing Hot Ends
- Maximum Print Temp: Important depending on what material is being used.
- Nozzle Size: Depending on the material type & print speed. Good for larger prints.
- Fixtures: Types of nozzles you can fix onto your hot end.
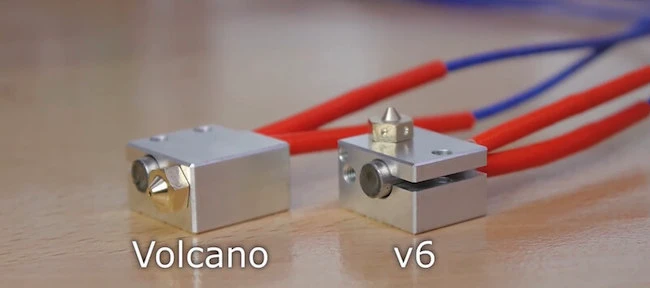
There are several types of hot ends, but for the time being we will break them up into two types.
- V6: Generally used for smaller print sizes
- Volcano: Has a larger nostril to allow larger amount of plastic to be extruded for larger print sizes
3D Printer Nozzle Type & Size
Since talking about the hot end, it’s only right to talk about the nozzle, which is actually the tip of the hot end where plastic comes out after being heated by the hotend.
Various nozzle sizes are avaible and can be exchanable when needed depending on your design’s desired results.
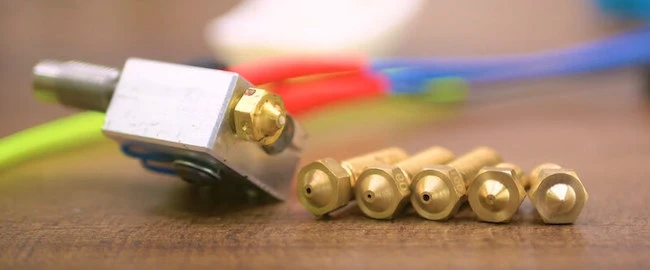
The sizes of nozzles can range from 0.25mm up to 1.0mm, with the most common size being 0.4mm. However, an other factor to consider is, they also come in a variety of metals for reasons discussed below:
Standard Size 0.4mm Nozzle
The layer thickness created by the nozzle is essentially the resolution, and the resolution determines how fast the printer can print your model.
As a nozzle gets larger, the layer thickness increase and therefore has a decreased resolution (decreased quality). It’s this decreased resolutions that allows for quicker print speeds.
Conversely, as a nozzle gets smaller, the layer thickness decreases and therefore has an increased resolution. This in turn provides finer detailed prints, but also slows down print speed. Hence why a 4mm nozzle is a good trade-off for decent resolution with decent print speed.
Smaller Nozzle Size
Some companies are manufacturing nozzles as small as 0.1mm but these are not typical though. A nozzle between 0.15mm and 0.35mm are typically considered “small”.
So what factors do we need to consider when using small diameter nozzles?
Increased resolution
Smaller nozzles create thinner layer thicknesses, finner details and therefore higher print quality – note, not all printers are compatible with smaller diameters.
Slower print speed
Smaller thickness layers means more time to build up the model. The difference in nozzle size is not linear to the added time in creating the model.
For example, printing with a 0.25 mm nozzle could take up to three times longer than printing with a standard .4 mm nozzle [R]
Clogging susceptibility
A smaller diameter hole is likely to clog up more for obvious reasons. This is particulatly true for lower quality filaments or non plastic ones.
Bigger Nozzle Size
With 0.4mm being the standard nozzle size, there are much larger diameters on the other end of the scale. A 0.8mm diameter is already considered large, however, there are some organizations that manufacture diameters up to 1.2mm.
So what are the factors we need to consider when using large diameter nozzles?
Increased printing speed & rapid prototyping
As more plastic is released, less layers are needed to build the model. This means faster print times which is handy for rapid prototyping.
Newer exotic materials
Newer exotic materials such as wood-fill or metal-fill need larger diameters nozzles because they contain larger particles.
Increased printing speed & rapid prototyping
As more plastic is released, less layers are needed to build the model. This means faster print times which is handy for rapid prototyping.
Resolution compromise
With increased diameters comes faster print speeds, but also a loss of resolution (finer detailed finish).
Heat loss
Loss of heat can be an other factor. A “wider” nozzle means a higher rate of loss of heat from plastic, resulting in clogs or poorly binding plastic when layers are added
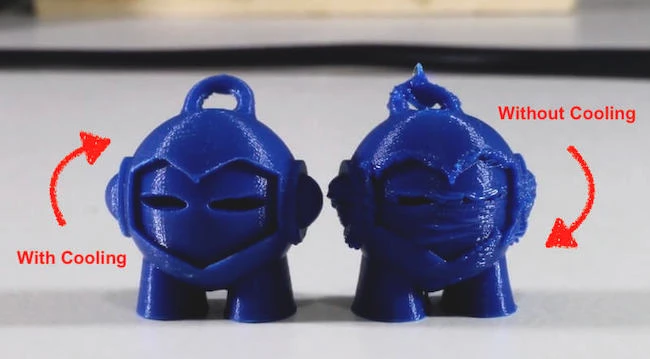
Cooling Fans & Their Importance
Often we discuss the importance of heating up the plastic to create the ideal viscousity of flow through the nozzle, but rarely do we talk about the cooling of plastic and why it is just as important.
The plastic is under control while going through the hot end and nozzle, but once deposited, it’s left to its own devices.
If the plastic is resting as a flat layer, the ambient room temperature can naturally cool it down. However, for more complex prints that have “bridge” type structures or “overhangs”, then a cooling fan is needed.
Notice how to top of the head has a “bridge” like structure? When the plastic is in a molten state there is nothing much supporting it. So the force that we know as gravity takes over and pulls it down (hence why we want to freeze plastic in place quickly with a cooling fan).
Watch this video: Quality Printing With Cooling Fans [10 mins 03 secs]
To save time, skip to timeline 00:14!
Also notice the “overhanging” sections of the model. Gravity is also playing havok with these sections because we are not solidifying the plastic quickly enough.
Note: These fans are even more important as your models get bigger in size.
Flat Bed
Your model has to rest somewhere while your printer is adding layers to it. This rest area is called the flat bed and can be made up of different materials such as:
- Glass
- BuildTak
- FlexPlate
- Metal
Each have their advantages for use.
For example, if we look at a glass flat bed, its advantages are that glass is superbly flat (layers added on perfectly evenly), very easy to clean, effortless removal of plastic and inexpensive.
The trick is to find the right suited flat bed for your requirements. Although each person’s requirements are different, generally speaking you want the following:
- A smooth printing process: If your flat bed is cold, it can cool down your first layer before the next layer is applied. This means inferior binding between layers and compromised model strength.
- Easy removal of completed print: You want to be able to pull your model from the flat bed easily. If fixed too well to the flat bed, a hard yank could damage your finished print.
- Easy to clean: Although you don’t want your model to stick too much to the flat bed, it is still important it stays in place during the printing process to allow for accurate printing. This often means using substances like glue which then needs to be cleaned for the next print. You want to minimize this process, especially if you are an avid printer.
FAQ
What’s the standard nozzle size of a 3D printer & why?
The most common nozzle size is 0.4mm diameter which is roughly the mid point of the nozzle ranges. It is often considered a good compromize as it has a good balance between print speed and resolution.
How many types of FDM extruders are there?
There are two types, Bowden and Direct Driver extruders. Bowden extruders are located away from the printer head and push the filament from a distance into the hot end. As it is not located above the hot end, it means it does not move with the print head making for more accurate prints.
Direct Drive extruders are located directly above the hot end and pull the filament into the hot end from a short distance away. This in theory reduces thing from going wrong when feeding, but does add more weight to the moving printing head that can compromize print accuracy, especially during sudden changes in direction.
Which filament diameters are the most common for FDM?
The two most common diameters are 1.75mm and 3mm diameters. Although the both have their advantages and disadvantages there is no real reason to change from one to the other if everything is functioning well. Having said that, the 1.75mm diameters are becoming more common and will likely become “the standard” with more variety of material range.