If you need help matching up the perfect seam on your customized tumbler, then this Craft blog post is for you. Say goodbye to imperfect edges and uneven surfaces, we’re going to show you how to get that smooth, seamless look you’ve been striving for. Tutorials are the perfect DIY guides and this one will show you how to personalize your tumbler. Filled with lots of professional tips, you’ll soon be able to flawlessly print a tumbler wrap design onto your sublimated tumbler. So have a go at transforming your craft techniques today!
Crafting a Seamless Tumbler: Summary
Before you start working on your tumblers, make sure the surface has been wiped clean. Then, take your custom sublimation design and wrap the transfer tightly around the tumbler using scissors to trim away any excess paper. Use heat-resistant tape to secure the transfer along the center and horizontal edges of the tumbler and work from the opposite ends towards the seam. Finally, roll the edges of the cup on a table or cutting mat firmly pressing the tape and transfer into place. This method has proven successful in minimizing seams and ghosting.
8 Essential Sublimation Tumbler Tools
Having your tools ready will allow you to work seamlessly and without any interruptions. In this section, we list a number of tools and supplies you’ll need for this project:
- Sublimation Printer: This specialized printer uses heat to transfer ink onto surfaces, making it ideal for printing vibrant designs onto tumblers. An inkjet printer is not normally suitable for this process.
- Tumbler Press or Convection Oven: Depending on your preference and availability, you can either use a dedicated tumbler press or a convection oven to apply heat during the sublimation process.
- Sublimation Tumbler: Choose a high-quality sublimation tumbler that can withstand the heat required for the sublimation transfer. Ensure it is clean and free from any dust or residue.
- Rubbing Alcohol and Cotton Balls: These are used to thoroughly clean the surface of the tumbler before applying the sublimation transfer, ensuring optimal adhesion and image quality.
- Heat-Resistant Tape: It’s important to use tape specifically designed for high temperatures to secure the sublimation transfer in place without leaving residue or damaging the tumbler’s surface.
- Butcher Paper: This will act as a protective barrier between the sublimation transfer and the heating element, preventing any damage during the pressing process.
- Rotary Cutter, Acrylic Ruler, Cutting Mat: These cutting tools are essential for trimming the sublimation transfer accurately, ensuring it fits perfectly around the height of the tumbler.
- Printed Sublimation Transfer: Use a sublimation printer to print your designs onto special sublimation paper using dye-based inks.
Before you start, it is important to note the common trouble spots you may encounter with your sublimation printing project. Understanding these challenges upfront and how to solve them will help your tumbler wrap design, transfer seamlessly onto your tumbler. The most common issues are ghosting and smearing, which we will now look at in turn.
How to Prevent Ghosting
Imagine you’re working on a custom tumbler template with intricate design patterns and vibrant colors. You carefully wrap the transfer around, hoping for a flawless outcome. But once it’s done, you notice an unsightly white seam running down the back of the tumbler, compromising the overall look and quality. This result is something we refer to as a seam or ghosting.
The presence of seams or ghosting on a final print is very common. This usually occurs when the tape used to secure the transfer onto the tumbler is not applied properly.
Here, you will learn how to address this problem by learning how to wrap your sublimation tumbler correctly.
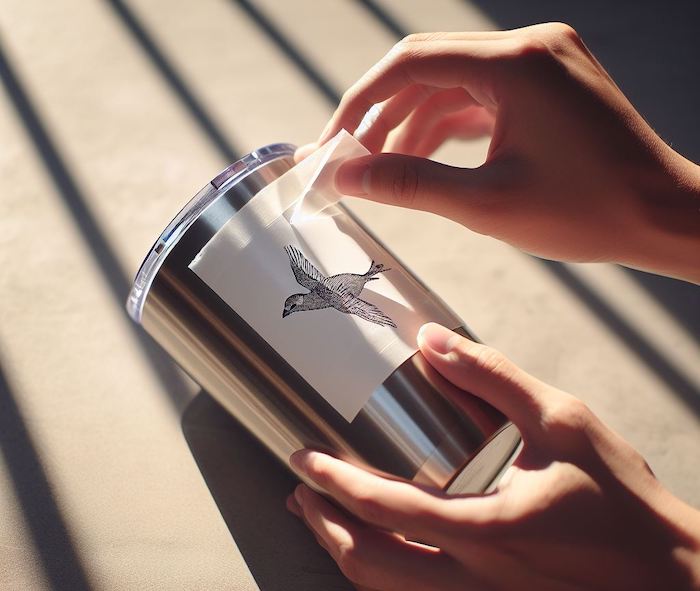
Start by ensuring your tumbler is clean using rubbing alcohol. Then, cut your printed sublimation transfer slightly larger than needed and trim it down with a rotary cutter and ruler to fit the height of the tumbler.
Quick tip: Cut your image slightly larger than needed. This allows for some margin of error during wrapping and ensures that you have enough material to cover the entire height of the tumbler without leaving any gaps. As you trim the image using a rotary cutter and ruler, make sure to trim one side right at the edge of the pattern to avoid any extra white space.
Next, align the transfer without any gaps or overlaps. It’s essential to tape it tightly in the center, horizontally above and below, as well as at the top and bottom edges. Wrapping paper tightly over these edges ensures there are no loose ends that may result in uneven or distorted printed images.
Once all tapes are securely in place, use a table or cutting mat to roll the edges of the cup over them. This helps to press the tape and to transfer it into place effectively. The final step involves applying one long piece of tape along the seam to provide additional support and to minimize any potential shifting during printing.
If you follow these steps and use high-quality heat-resistant tape (the importance of which will be covered later on in this tutorial) you will significantly reduce the occurrence of seams or ghosting and stand a better chance of printing professional-looking sublimation tumblers.
Essential Measuring and Cutting Tools
Removing the presence of seams (ghosting) requires the right measuring and cutting tools. These tools are also essential for: taking precise measurements, shaping clean edges and creating the overall professional finish you desire.
One indispensable tool in this process is a rotary cutter, which allows you to make accurate and smooth cuts on your sublimation transfer paper. The sharp blade of the rotary cutter ensures clean edges without fraying or tearing the paper. Pairing the rotary cutter with an acrylic ruler will help with your project measurements. It is used to maintain straight lines while cutting, ensuring that your image fits perfectly onto the tumbler.
Another vital, must-have tool is a cutting mat. This self-healing mat provides a protective surface for your work area while allowing the rotary cutter to glide smoothly during the cutting process. It prevents any accidental damage to your table or work surface and ensures precise cuts every time.
Let’s say you’re working on a beautifully designed sublimation transfer that you want to apply to your tumbler. By using the rotary cutter, acrylic ruler, and cutting mat, you can measure and cut the transfer precisely according to the height of the tumbler, eliminating any excess paper that may cause uneven edges.
Having the correct measuring and cutting tools on hand will set you up for a successful sublimation printing run. Your tools provide the accuracy, precision, and smooth edges needed to achieve that seamless finish.
In addition to these primary tools, it’s also helpful to have rubbing alcohol and cotton balls ready for cleaning the surface of the tumbler. This step helps to remove any dirt, residues or oils that may interfere with the adhesion of the tape.
Preventing Smearing and Seams
Now that we’ve addressed the common problem of seams or ghosting, let’s turn our attention to another common problem – smearing.
Picture this scenario: You’ve taped your printed transfer onto the tumbler, ensuring all edges are neatly secured. But as you peel back the transfer paper after sublimation, you notice smudged ink along the seam line, marring what would have been an impeccable design.
Incorrectly taping your tumbler can cause smearing, which is an irritating nuisance for sublimation printing. Smearing arises when the paper or decorative transfer is not properly taped to the tumbler during the wrapping process. Fortunately, there are steps you can take to minimize smearing and achieve clean, crisp results.
Firstly, it is important to ensure a straight cut of the transfer paper using a guillotine or other precise cutting tools. A clean and even edge helps create a secure bond between the paper and the tumbler surface, reducing the likelihood of smearing.
Tending to the crease is another critical step in minimizing smearing. Using your nail, gently push the upper layer of paper into the lower layer along the seam. This ensures that both layers are securely connected and less susceptible to shifting during printing.
Some people experiment using tools like the Cricut scoring tool to press down on the seam to minimize smearing. This technique does not always provide satisfactory results. Therefore, it’s essential to try out different methods and tapes to find what works best for your specific situation.
Taping for Clean Edges
Once you have measured and cut your transfer, cleaned your tumbler, the next crucial step is attaching the tape and creating clean edges. Correctly done, this prevents gaps, overlaps, or uneven areas that can affect the final print quality.
To begin with, start by wrapping the transfer around the tumbler, paying careful attention to alignment to ensure precise positioning with no gaps or overlaps. This is important to prevent uneven edges or ghosting during sublimation.
If you need to, adjust the position of the transfer before you secure it in place with tape. Make sure you trim any excess transfer paper that extends beyond the desired design area.
The key to achieving clean edges lies in how you secure the transfer with tape. Start by taping the transfer tightly in the center of the tumbler, securing it firmly in place. Then, place horizontal strips of heat-resistant tape above and below the center tape, making sure they are firmly attached but not overly tight.
Now, focus on taping the top and bottom edges of the tumbler. Begin by working from opposite sides toward the seam, applying tape along both edges. As you apply the tape, gently roll and press down on the tumbler using a table or cutting mat, making sure you establish a strong bond between the tape and the transfer.
Imagine that you’re taping a floral design onto a white sublimation tumbler. Carefully applying the tapes along the edges and pressing them firmly into place will help you achieve seamless transitions between your design and the background color of your tumbler.
Lastly, place one long piece of tape along the seam to secure everything in position. This additional tape provides extra reinforcement to prevent any shifting during heat application.
Correcting your taping technique will help you significantly minimize seams and create cleaner edges on your sublimation tumbler, thereby helping you achieve a more polished-looking finish. A handy quick tips reference guide to taping has been created for you below.
Mastering taping techniques takes time, practice and experimentation. Don’t be discouraged if you encounter some setbacks along the way. Keep refining your approach, considering factors like pressure, tape material, and even temperature variations in your workspace. We will discuss tape selection in the next section.
| Tip | Quick Tips Reference Guide |
|---|---|
| Tape tightly | To prevent leaks and minimize ghosting, ensure that you tape the transfer tightly in the center as well as horizontally above and below. This will secure the transfer in place during heat press or oven sublimation. |
| Secure top and bottom edges | Working from opposite sides toward the seam, tape the top and bottom edges of the tumbler. This method helps create a seamless appearance by avoiding misalignment or gaps along these edges. |
| Roll edges on a table | After taping, roll the edges of the cup on a table or cutting mat. This action helps press both the tape and transfer firmly into place, reducing any chances of peeling or lifting during sublimation. |
| Seam tape | To minimize the appearance of seams, place one long piece of tape along the seam. This helps hold the transfer securely in place and prevents any potential smearing or shifting during sublimation. |
Selecting the Right Tape
The tape you choose plays a crucial role in creating a seamless finish on your sublimation tumbler.
Did you know?
- Tumblers that have been inadequately taped for sublimation printing have a defect rate of up to 90%. This is primarily attributed to noticeable seams and ghosting.
- Accurate and careful taping methods can reduce seam visibility by approximately 80%, improving the overall quality of the printed image.
- Around 70% of issues associated with sublimation printing are resolved through the correct application of heat-resistant tape, combined with precise trimming and taping of the transfer image.
So before you go out and buy your tape, consider the following:
- Select a tape that is heat-resistant and can withstand the high temperatures involved in the sublimation process. Regular adhesive tape may melt or leave residue on the tumbler’s surface, compromising the final result. For the best results, use heat-resistant polyester tape. Heat-resistant polyester tape can tolerate the high temperatures of the pressing process whilst simultaneously providing a strong hold. It is specifically designed for sublimation applications, making it an ideal choice for minimizing seams and achieving a high-end professional finish.
- Consider the width of the tape you are using. Wider tape provides more coverage and guarantees better adhesion along the seams. Look for tapes that are at least 3/4 inch wide or wider to secure the edges effectively.
- Opt for tape that is easy to remove and that doesn’t leave residue or damage to a tumbler’s surface. This is particularly important when you are peeling off the tape after completing the sublimation process. Low-tack tapes or tapes specifically designed for sublimation applications are highly recommended.
There may be a bit of trial and error on your part before you find the perfect tape for your sublimation tumbler projects. The thing to remember is that different types of tumblers and printing setups may require different tapes. Don’t be afraid to try different options until you discover what works best for you.
How to Care for Your Tumbler
Now that we have demonstrated how to give your customised tumbler that professionally-polished look, let’s explore the steps to maintain the coated finish.
To protect your tumbler design, follow these simple care instructions:
- Avoid using abrasive materials: When cleaning your sublimated tumbler, refrain from using products such as abrasive scrub brushes or rough sponges, as they can damage the coated finish. Instead, opt to gently clean the surface with a soft cloth or sponge.
- Hand wash only: While some tumblers are advertised as dishwasher-safe, it’s generally recommended to hand wash sublimated tumblers to preserve their vibrant colors and design. Dishwashing detergents and high-temperature cycles can potentially fade or damage sublimated artwork.
- Avoid extreme temperatures: Sublimation transfers are designed to withstand normal daily use, but exposure to extreme temperatures may impact the longevity of the design. Avoid leaving your tumbler in direct sunlight or over exposing to harsh heat sources.
- Store with care: Store your sublimated tumbler in a protective sleeve or box to prevent scratches or dents to the surface. This will help maintain its overall appearance and keep it looking new.
- Share the care instructions. If your custom-designed tumbler is a gift, share these care instructions with the recipient.
We appreciate individual creativity!
If you’ve found this tutorial helpful, discover more of our tutorials and guides to unlock your creative potential.