Most sublimation issues aren’t random. They follow predictable patterns that always reveal what went wrong. If you’ve ever seen blurry edges, faded color patches, or a faint shadow around your graphics, you’re not dealing with a “bad press”, you’re seeing a specific failure mode.
What causes sublimation print failures?Sublimation failures happen when heat, pressure, time, or environmental conditions disrupt how dye converts to gas and bonds to the substrate. Each defect has a distinct visual fingerprint — from ghosting caused by vapor drift, to moisture blotching caused by trapped steam, to banding caused by uneven ink deposition. Identifying the pattern tells you exactly which parameter failed.
Most people try random fixes (“more pressure,” “add tape,” “press longer”), but sublimation doesn’t improve by guessing. Each failure has a cause rooted in physics, chemistry, or material behavior. And once you know what the defect means, you can correct it instantly.
This article lists the nine failure modes you’re most likely to encounter, and the science behind why they occur.
Sublimation failures are predictable, not random..
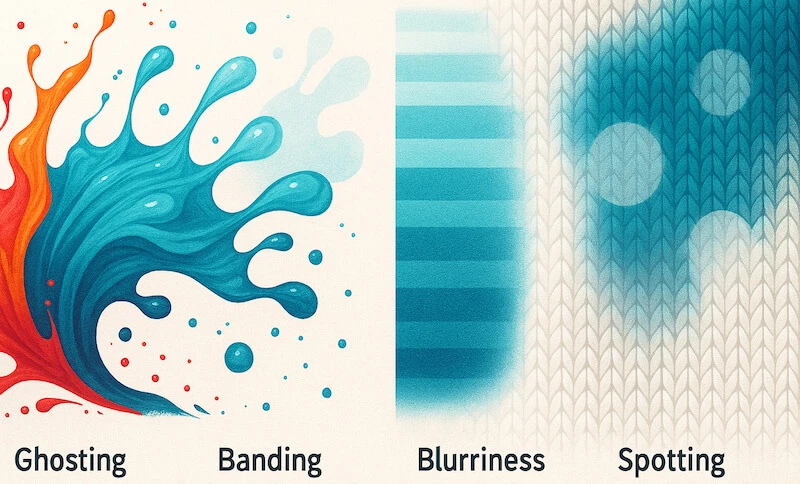
Each defect (ghosting, banding, blurring, moisture blotching, gas bleed, under-pressing, orange peel, compression marks, and graininess) is linked to a specific variable: heat, pressure, time, moisture, or substrate behavior.
Every failure has a visual fingerprint.
Ghosting shows a faint duplicate image, banding shows horizontal lines, moisture blotching leaves light spots, gas bleed causes soft melted edges, and orange peel reveals the texture of the polymer coating.
The cause is always rooted in science, not luck!
Vapor drift causes ghosting. Steam diffusion causes moisture blotching. Overheated dye increases molecular mobility and causes bleed. Compression alters fiber geometry and leaves shiny marks.
Fixing sublimation is about diagnosis, not guesswork.
If the defect tells you the failure mode, you can adjust the right variable instead of randomly changing settings.
Mastering these nine failure modes builds control.
Sublimation becomes consistent once you understand how dye behaves as it transitions from solid → gas → bonded state.
1. Ghosting (Vapor Drift)
Ghosting occurs when dye is still in gas phase after the paper or press shifts, even slightly. Because the dye is still active, it transfers a second image wherever the gas is able to escape.
Most ghosting isn’t caused by motion of the paper while the press is down, it happens as the press opens.
The Micro-Mechanism of Vapor Drift
Think of the dye vapor like smoke trapped between the transfer paper and the substrate. When the press suddenly opens, pressure drops instantly, vapor expands quickly and uncontained dye escapes outward…that escaping dye settles on newly exposed fibers, creating the faint “shadow.”
How to Eliminate Ghosting (Based on Physics, Not Guesswork)
- Stop the vacuum effect: Open the press slowly — fast lifting creates suction, pulling dye vapor and causing ghosting.
- Use a gas barrier: Tape only two opposite corners — too much tape lets the paper pivot and shift.
- Pre-press the substrate: Pre-pressing removes moisture — trapped moisture turns into steam and pushes dye away.
- Use blowout paper correctly: Place blowout paper above and below fabric — it traps stray vapor so it can’t migrate.
- Cool without movement: Don’t move the substrate until cool — dye stays active until below ~150°F / 65°C.
2. Micro-Blurring (Soft Edges)
Micro-blurring appears as slightly fuzzy or soft line edges and happens when too much heat or dwell time makes the dye vapor spread beyond its intended boundary.
3. Moisture Blotching (Light Spots or Patches)
Moisture blotching shows up as uneven light patches because trapped moisture turns into steam under heat, pushing dye away from the affected areas.
4. Banding (Printer-Induced Lines)
Banding looks like repeating horizontal lines and occurs when the printer isn’t laying down ink evenly — usually from a clogged nozzle or incorrect print settings.
5. Graininess (Speckled or Noisy Color)
Graininess happens when the substrate or ink can’t accept more dye, causing dye particles to cluster and create a speckled texture instead of smooth color.
6. Gas Bleed (Over-Penetration)
Gas bleed looks like melted edges or muddy colors and is caused by excessive heat or time, which allows dye vapor to travel beyond where it should bond.
7. Under-Pressing / Low Dye Conversion
Under-pressing results in dull or faded colors and happens when heat or time isn’t enough to fully convert the solid dye to gas.
8. Orange Peel (Surface Texture Defect on Hard Goods)
Compression marks happen when too much pressure permanently flattens polyester fibers, leaving glossy rectangles or outline marks.
9. Heat Scorching / Polyester Discoloration
Scorching occurs when polyester overheats and begins to yellow or distort, because polyester softens at high heat and can partially melt.