In today’s world, customers have the freedom to bring their creative visions to life through printing. Whatever questions they may have, the modern screen printing industry offers a diverse range of possibilities. This includes the ability to print on various materials such as paper, textiles, plastic, wood, and fleece.
The flexibility and versatility of screen printing empower individuals to express their desires and preferences, leading to an increasing number of people setting up their own printing shops to fulfill the unique orders of customers.
Key Takeaways
Importance of material types
Each material has a different characteristic and feel. Therefore, different mesh counts are required for different materials in order to produce the best results for specific applications.
Ink usage and the different types
The texture and type of ink will determine what mesh count is required. The ink needs to pass through the correct mesh openings for the print to transfer on to the fabric correctly.
Ink to mesh count ratio
A thinner ink with a larger opening mesh will bleed and blur your design.
Use a higher mess count than required and the ink will transfer thinly. The result: a print that may appear washed out.
Thick ink application with a fine mesh can hinder it from passing through, causing a patched design.
The level of detail in a design is intricately tied to the mesh count. Fascinatingly, using mesh sizes with over 355 threads per inch allows for achieving an astonishing resolution of 20 microns. This level of precision is more than 20 times finer than a human hair! The mesh count plays a significant role in capturing the smallest dots and intricate elements, elevating the quality of the artwork to a whole new level.
Let’s delve deeper into these tips that will help you discover the perfect mesh count for your artwork, ensuring that every detail is captured flawlessly.
Post 1 of 3 in the screen printing
What Is Mesh Count Anyway?
In the realm of process prints, while the fundamentals of screen printing equipment remain consistent, one crucial factor to consider is the screen mesh count. Screen mesh counts vary, ranging from numbers like 86 to 355, and understanding the appropriate size for your specific needs is essential. Each mesh count has its own unique characteristics and capabilities, impacting the level of detail and quality achievable in the printing process.
So, discovering your lucky number, the perfect mesh count, becomes crucial in ensuring optimal results for your screen printing endeavors. If you’re new to screen printing and want to learn more about the process, you can check out our comprehensive article on what is screen printing for a detailed explanation of this fascinating technique.”
As a screen printer, it’s important not to let minor discrepancies in mesh count cause unnecessary concern. Interestingly, when it comes to counts between 120 and 130, the final printed result tends to exhibit similar outcomes.
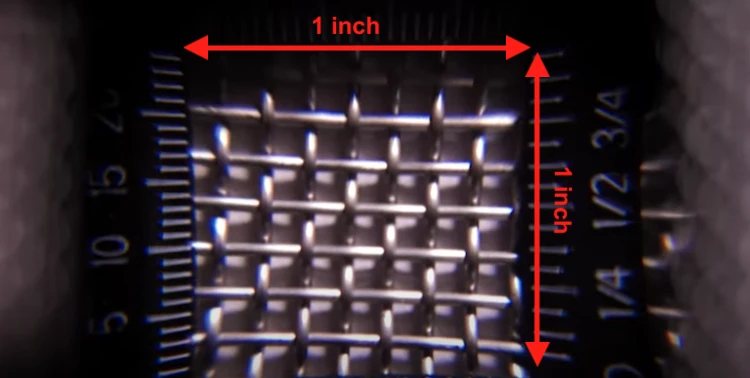
Mesh count, determined by the number of openings or holes within an inch in any direction, plays a significant role in the printing process. However, it’s worth noting that certain prints may necessitate the use of a mesh with a different count than originally intended. Flexibility is key, and being open to adjusting the mesh count based on the specific requirements of each print ensures that everything aligns seamlessly to achieve the desired outcome.
With experience, your ability to select the perfect mesh size for your screen printing needs will improve. However, it’s crucial to consider industry recommendations as a valuable standard. These guidelines ensure informed decisions regarding mesh sizes, aligning with the best practices of the screen printing industry. By adhering to these guidelines, you can optimize the performance of your screen printing inks and achieve exceptional results.
General tip:
- Lower mesh count = more ink transfer = less detail
- Higher mesh count = less ink transfer = more detail
Mesh Count Cheat Sheet
If you’re pressed for time and seeking a quick reference for selecting mesh sizes for your t-shirt project, we offer a handy guide. Keep in mind that this cheat sheet serves as a general reference and should be used as a starting point. It’s designed to provide guidance, allowing you to adjust and fine-tune until you achieve the desired results.
Use this guide as a helpful resource and feel free to make tweaks along the way until you’re satisfied with the outcome.
- 60 – 90: Ideal for glitter / shimmer inks as these particles can’t pass through finer mesh types.
- 110: Commonly used when your design requires white plastisol ink (not ideal for water-based inks).
- 160: Most common count used for a variety of ink types and substrates (if in doubt, try this mesh count).
- 200 – 240: Used for highly detailed artwork. Great for water based inks on substrates like wood or paper.
- 280 – 305: Used for very fine detailed artwork like signs and halftones.
Determine The Purpose of Your Print
Before starting your screen print, define what kind of print you need first.
On some occasions, blurry designs are OK. Usually, clothing and fashion products permit blurry edges or lines like a cool, fashioned thing. Others require fine mesh counts, clear illustrations, or content. In both cases, a proper mesh count is essential.
Take into account, that printing the same image with the exact mesh on paper, a garment, or any textiles won’t yield the same results. The problem is not every material absorbs ink in the same way. In the case of T-shirts or hoodies, they soak more ink. Others, like paper, soak less ink, and some don’t absorb at all, like plastics.
Finding the correct amount can be challenging, but not daunting!
Not Every Material Is The Same
Let’s say you’re having a party. You need invitations, banners, glass wrappers, place cards, balloons, and other decorations from different materials. And, of course, a separate mesh count. How to decide which to use for these jobs?
Paper invitations
For printing invitations, you’ll need a higher mesh thread count. This is essential, since fine details are required for the text, lines, or small artistic representations.
Sizes from 200 to 300 counts are ideal for this. The precise number depends on the quality of paper and how absorbent the underbase is.
For example, higher mesh count numbers give you high-detail prints because the threads are closer together. That way, you may need thinner inks to run through the mesh print over the desired areas!
Decor
For decoration, you can use various materials, among which the most common are cotton, silk, and wood. Be careful, those are entirely different mesh counts.
If you print on wooden, use around 200 mesh count with water-based inks. Don’t use a lower mesh count because they have a larger diameter. The layer of water-based ink is thinner than plastisol, so you don’t want it to bleed through the openings and make a mess.
Banners are great for any celebration. But use the wrong mesh count, and you’ll make life difficult. There’s no point using ink that’s not compatible with your printing goals. Inks have different viscosities. You don’t want blurry images and smudged colors. You won’t use thinner inks when you want finer details for celebration and nice glittery decor. Simple. Right?
For printing puffs or glitter on different textiles, you should purchase glitter inks. These work best with a lower mesh size. There’s a difference between glitter inks and other ink types. They have shiny grains that have to pass through the mesh opening. As a result, the opening must be large enough (lower mesh count). Lower mesh counts and inks with thickness are an excellent combination for your T-shirts, cushions, ribbons, or ties.
Clothes and textiles
Screen printing on cotton is very popular and common for T-shirts and cushions. If you want a lovely, colored print with fine details, your choice must be a finer mesh count, like the size up to 200 mesh counts. This size will give you a thick color print and a clear image. Yet, if high-quality print isn’t your end goal, lower mesh counts between 140 and 160 will do the job.
Ink Types & Their Differences
Inks have different textures and a diverse range of compatibility with materials and fabrics. Choosing the right one simplifies your screen printing process.
Let’s look at more information on the types of inks that can be used in screen printing.
Glitter inks
Glitter ink deposit requires a lower mesh count so the ink particles can get through the larger openings. The best size for their usage is around 80 mesh counts. Commonly printed glitters are puffs on athletic clothing for sparkle details on clothes or notebooks and birthday cards.
Water-based inks
Water-based ink is an excellent choice for simple prints. But carefully, water-based inks tend to dry out quickly on high mesh screens.
As soon as you start working with water-based ink, exposure to air dries it out. You’ll continually struggle with cleaning high mesh screens for long-time use. Supplies like retarders, which frequently keep ink running smoothly, can help prevent dryness.
UV inks
Screen printers that use UV inks work better with a higher mesh count (between 350 and 400). That way, printers can easily control the thin UV ink and give the best outcome on the printed material. They are usually used for printing on plastics.
What If You Don’t Use The Right Mesh?
If you miss the mesh count, you won’t be satisfied with the screen printing results, and you’ll probably have to go back to the beginning and, this time, choose the right mesh count.
So, using the wrong mesh count can inhibit the capacity of the ink to represent the image. These are the things that could happen:
Blurred print
A lower screen printing mesh count won’t be able to support an extremely high detail image.
If you choose a thinner ink and the mesh with larger openings, the ink will flood through the openings and soak into the substrate or your shirt, blurring your design as it bleeds.
Small ink deposit
Although you can print with the wrong mesh count and get a good image, the ink deposit might not be solid.
Using a higher mesh count than needed, you might not store enough ink. The printed ink will be too thin to be long-lasting, or the image may appear washed out.
On the other hand, you’ll deposit too much ink using a mesh count that is low. The ink deposit will be thick, making the image look messy. This ink might fade or crack in time!
Spoilage
With thicker inks, using a mesh count that is too fine (up to 300) can hinder the ink from passing through. This causes a patched design.
With a flowing, water-based ink, using a mesh count that is too low (25–110) might cause too much ink to flow and be unable to set correctly.
Additionally, while working on a highly detailed design, mesh openings that are too large can cause ink bleeding and a loss of detail.
When using decorative textures, such as glitter, the finer mesh could result in the mesh becoming stuck. It will make it harder for the paint to attach to the surface.
Be patient with finding out the right mesh count.
Try out different materials, combine them with different printing mesh counts and see where your needs fit best.
Watch this video: Mesh Count for Screen Printing? [05 mins 23 secs]
Author’s Mental Note
In this article we give guidance as to what is the required mesh count for your print. The mesh count will depend on several factors such as the ink type (viscosity), the material the ink is applied to, and even the level of detail you want your print to come out as.
General guides are a good starting point, but there is no “exact” mesh count for any situation. There are multiple variables that can be used and often similar results are acquired using different mesh counts.
Like with any craft, experimentation is key to understanding that craft. What works best will be determined through trial and error.
It is only a matter of time before you get a “feel” for what works and what doesn’t!