Creating a customized gift is a heartfelt way to show your love, and crafting your own vinyl mugs is not only a budget-friendly option, but also adds a personal touch that speaks volumes. With dollar-store mugs as your canvas, the possibilities are endless. However, the key to ensuring the longevity of your design lies in the art of sealing.
But how do you seal vinyl on a mug?
Sealing your vinyl decals on ceramic mugs is a simple yet crucial step to enhance their durability and make them dishwasher-safe. In this quick and easy guide, we’ll not only answer that question but also walk you through the entire process, from choosing the right vinyl and exploring sealing options to providing a step-by-step guide on application.
I’ve embarked on numerous projects, and one that stands out is adorning mugs with vibrant vinyl designs. Trust me, it’s surprisingly straightforward and very fulfilling. In this guide, I’ll walk you through the process, detailing the supplies you’ll need and providing step-by-step instructions.
Sealing isn’t just a technicality; it’s the secret ingredient that transforms your DIY mugs into dishwasher-safe, fade-resistant masterpieces. Say goodbye to concerns about premature fading and peeling!
If looking for other fun ways of decorating and sealing mugs, click on the link to find out more!
Why Should You Seal Vinyl Decals On Your Ceramic Mugs?
Your personalized gifts will benefit from vinyl decal sealing. It will look a lot nicer, just like you bought it in a shop. The seal will also ensure the recipient can use and enjoy it for a lot longer.
Here are a few benefits of sealing vinyl decals:
- Longevity of the product
- The durability of your mug
- Less hassle during the cleaning process
1. Enhance design durability with adhesive sealant
If you want to make sure the vinyl design on your mug lasts, seal it with a permanent adhesive vinyl. This adhesive will add a transparent protective coating. As a result, it will prevent the peeling of the vinyl decal on your mug. It will also prevent the vinyl from getting damaged.
2. Strengthening ceramic mug durability
Ceramic mugs are durable, but a permanent seal enhances that durability. This is because they add another protective layer. With this additional layer applied, you won’t have to worry about your vinyl decal peeling off!
3. Ensure dishwasher friendliness
Cleaning your mugs will be easier because you won’t be concerned about your decoration peeling off. The seal will protect the vinyl from the cleaning process.
If you choose to use the correct sealant, your mugs can also be dishwasher friendly, which is always a plus! This is particularly true if you wish to gift your mug… people might naturally put it in the dishwasher without thinking twice!
Exploring the Distinctions Between Indoor & Outdoor Vinyl Types
For crafters and DIY enthusiasts, it’s crucial to include a clear understanding of the two main types of vinyl supplies available: indoor vinyl and outdoor vinyl. These materials are essential components when working on various creative projects, and choosing the right type is a pivotal decision.
Indoor vinyl and outdoor vinyl each serve a unique purpose and exhibit specific characteristics that can greatly impact the success of your crafting piece. By discerning the differences between these two vinyl options, you can make informed decisions about which supplies to use, ensuring your craft piece not only looks great but also stands the test of time
Indoor vinyl
This type of vinyl has a matte finish. It’s meant for indoor use, meaning that it can be switched out for other decals at any time.
Want to learn more on what are removable vinyls used for? Then click the link to find out!
These types of vinyl are not ideal for adhering to mugs. This is because they are designed to be removed easily. Therefore, they won’t withstand any type of washing.
Outdoor vinyl
On the contrary, this type of vinyl is permanent vinyl. Once it is stuck onto something, it will not move. If you want your designs to last and to be able to wash it, this vinyl is perfect for you. So if you want to dabble in sealing vinyl on mugs, this is the type to use.
Most outdoor types of vinyl have a glossy finish. But there are matte options too. These pieces can be removed, but can be difficult to do. Care is required as you could potentially pull of paint or ceramic.
What Products Can I Apply As A Vinyl Sealer To Mugs?
Permanent adhesive vinyl can withstand hand washing and dishwashing effectively. However, it is a matter of time when this permanent adhesive can start deteriorating. As a general rule, if you plan of washing your mugs regularly (especially in a dishwasher) it’s recommended to use a sealer. You can achieve this by using several products on the market.
Here we cover 4 recommended sealer options for protecting your decals:
1. Triple thick
This product can be found in a lot of in-person and online stores, making it a practical option. It can be found in the shape of a spray sealant or a jar container. This product has a distinctly thick consistency, compared to other sealant options.
You may want to use Triple thick if adding glitter or other textured decorations. Because of its thick consistency, the rough texture of the glitter will sink in. This will leave you with a smooth surface to the touch.
You can apply this product in several ways: with a brush, a sponge, or a foam brush. This product is not directly marketed as being dishwasher-safe. However, the fact that it is so thick in consistency makes it dishwasher-safe, making it a competitor to Mod Podge.
2. Mod podge/ Modge podge
This product is also found in a number of stores, and comes in several finishes. Finishes include matte, glossy and there’s even a glitter option. There is also a completely non-toxic and dishwasher-safe mod podge option. This is more than suitable for use in projects that involve children.
However, it should be kept in mind that the dishwasher mod podge has received some mixed reviews. So when searching for a dishwasher-safe alternative, the Triple thick option could be more suitable.
When using this product a number of layers should be applied. Make sure not to apply layers think, or it will take too long to dry.
Also, the drying time of Mod Podge is quite long. It can take up to 28 days for it to fully dry. So if you are in a time crunch, then this wouldn’t be the best option for you.
3. Epoxy resin
This material can be used for several things besides sealing vinyl on mugs. It can be used for creating jewelry and dice when put in silicone molds. Because of this, we can conclude that this is probably one of the most durable options when it comes to sealing vinyl on mugs; it is a heavy-duty sealant. However, epoxy resins is the more expensive option. You should keep that in mind.
The results after using epoxy resin is astonishing. You will be left with a glossy coat that is hard, durable and dishwasher-safe. The surface of the mug will have to be cleaned with rubbing alcohol before application. The drying or curing time varies, but it is usually a quick process. It is also a self-leveling material, and completely food safe (approved by the FDA).
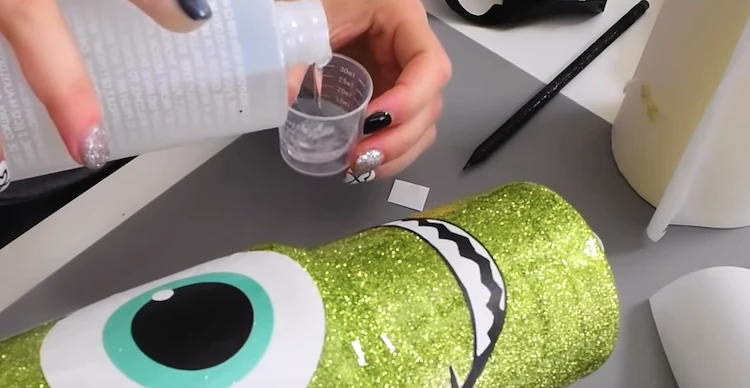
This product has to be mixed manually. In your package, you will receive two different liquids that will have to be mixed in a specific ratio. This process can be messy, so using gloves is advised. These liquid components do not come pre-mixed because as soon as they touch they start to harden.
When mixing the two liquids together, make sure you stir evenly and thoroughly for about 5 minutes. This ensures the epoxy will dry evenly on the layer you add it to.
This type of product is used to seal vinyl mugs. It cannot be reused because it will harden in a few minutes.
4. Polycrylic
This product is different from the others because it is water-based. It’s usually used for varnishing wood and wooden items like furniture. We can conclude that this product will probably not hold up in the dishwasher, and therefore is not dishwasher safe. You will have to handwash any mugs with a vinyl design sealed with this product.
It is available in spray form, making it easier to apply even thin coats. This product needs to be applied thinly to cover the area effectively. If applied too thick, your design will either crack or peel.
How To Apply Vinyl & Seal Vinyl On Mugs?
Here is a simple guide that will help you apply and how to seal vinyl on a mug:
- Cut out the desired outline- Firstly you have to pick your design and follow the directions provided by your cutting machine. Your cutting machine should have arrived with all the necessary directions for you to follow.
- Weed the vinyl decals- With the help of your weeding tool and/or fingers, you should carefully start removing all the extra vinyl from the decal. You should pay special attention when doing this because the result should represent exactly how you want the finished mug to look.
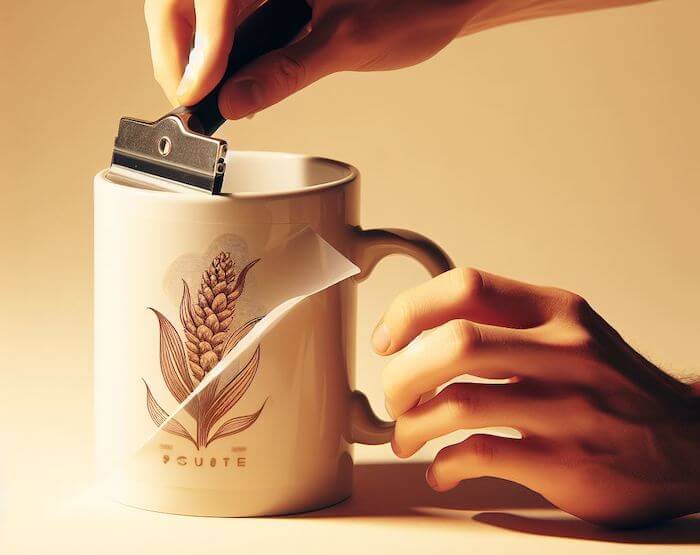
- Apply the transfer tape- Now, carefully cut the appropriate amount of transfer tape and remove the backing of it. Then, you should carefully apply it to the permanent adhesive vinyl, trying to do so as smoothly as possible. A tool that could come in handy in this process is a scraper.
- Get the mug ready- As we have mentioned before, it is crucial to clean your mug with rubbing alcohol before applying vinyl. By doing this you will be removing any dirt, oils, or fingerprints that may be on your mug, making the adhesive vinyl stick better onto it. Now you should remove the backing from the vinyl of your choice until the vinyl design is positioned directly onto the transfer tape.
- Apply the chosen vinyl design- The next step is positioning and applying vinyl designs on your mug. Using the aforementioned scraper tool, apply pressure on the parts of the mug that are in contact with the vinyl. Once you have applied everything, carefully remove the transfer tape, making sure to apply a constant force, but also being careful to not disrupt the design.
- Seal the vinyl- This last step will greatly vary based on the type of sealant you want to use. Different sealants have to be applied in different ways. As we have previously discussed, sealants like mod podge, triple thick, and epoxy resin can all be applied using a brush made out of different materials.
However, Polycrylic has to be applied in a spray form. All of these sealants will result in a glossy finish. It is important to keep in mind that when working with these materials, each coat should be applied in thin layers and you should always let the previous layer completely dry before adding a new one. If you apply one thick layer, the results will not be satisfactory.
Also, for safety reasons, avoid putting non-FDA-approved sealants at the lip of the mug as they could result in poisoning. Now, all that is left to do is to let your mugs dry for an appropriate amount of time, which will vary greatly based on the type of sealant you are using.
Tools Needed To Seal Vinyl Mugs
This craft is generally an easy one and virtually anyone can do it, no matter how little experience you have. However, applying vinyl on mugs takes at least a bit of preparation and adequate tools, and we will provide you with a list of exactly those.
1. A Cricut cutting machine
This special machine is a great investment if you want to create beautiful and professional-looking mugs. Its purpose is to cut out the vinyl with a precision much greater than those that humans have when using an Exacto knife or scissors. Also, this machine will save you a lot of time as it is notoriously quick at doing its job.
This machine will become a necessity if you want to create a vinyl mug that looks gorgeous and like it was bought in a shop because the precision of it truly makes a huge difference. There is several different settings that this machine offers and you should make sure to choose one that is most suitable for your project.
2. Weeding tools
The process of removing the extra adhesive vinyl when applying vinyl to mugs is called weeding. This ensures that the design you have chosen and printed out stays put on your mug of choice. Weeding can be done by hand, however, if you choose to create a plethora of mugs with highly detailed vinyl designs, investing in a weeding tool might be smart.
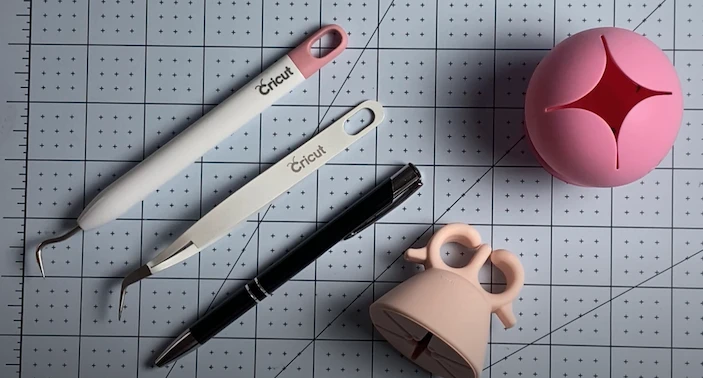
These tools will not only greatly speed up the peeling process, but they will also ensure that all of your tiny and detailed parts of the design are not damaged and peeled off properly, ensuring the longevity and overall pleasing look of your mugs.
3. Scraping tools
This tool is used for a lot of things in crafts and it can be found in craft stores. It usually consists of a scraper with a rubber edge that guarantees that the material you are scraping things off of will not get damaged.
When it comes to using it when applying vinyl on mugs, it is used to put an even amount of pressure on the curved surface of your mug. It makes applying vinyl on mugs tremendously easier.
These tools will surely be of great help to anyone interested in sealing vinyl on any items. Though they are not necessary to complete these projects successfully, they will save you a lot of time and frustration if you do choose to purchase them.
4. Transfer tape
The transfer tape that is used for decorating an entire mug of your choice acquires you to apply transfer tape by yourself. In some other projects, a carrier sheet is provided in order to help in this application, however, when it comes to decorating mugs this is not the case. You must use the standard grip type of transfer tape.
Sealing Vinyl On Tumblers
Besides mugs, you can also seal vinyl onto tumblers. This will result in another original and personalized present for one of your loved ones, and it is way more practical than a mug. If you want to know how to apply vinyl to tumblers, here is a short guide:
- Curing the adhesive vinyl- Carefully place the vinyl of your choice on the tumbler. With the help of a scraping tool do your best to smooth over any air bubbles that may appear. Cure the adhesive vinyl for a few hours or even days.
- Wipe the tumbler- It is necessary to wipe the tumbler down with rubbing alcohol before applying a sealant. This ensures that any oils and bacteria that might cause the sealant to not adhere properly are cleaned off.
- Put sealant over the vinyl- Firstly apply painter’s tape to the mount of the tumbler. Pour an appropriate amount of sealant into a container and using a brush coat the tumbler. For spray sealants simply spray on a few thin layers over your design.
- Curing the sealant- This step is vital in ensuring that the sealant of your choice stands the test of time. The curing time will vary based on the type of sealant you are using. For example, Mod podge takes 28 days to cure so make sure you read the directions carefully.
This process is quite similar to the process of sealing vinyl on mugs, but it is important to read instructions on your sealant carefully when doing either project. No matter which item you choose, if following the instructions properly and giving enough time for the sealants to fully cure, you will create some gorgeous personalized presents.
Conclusion
All in all, there are many benefits to sealing your mugs after applying vinyl to mugs. Besides this process prolonging the lifespan of the mug, it will also make it dishwasher safe (depending on the type of sealant) and ensure that your mugs look amazing!
There are many products you can use in the sealing process and we have listed the ones that we believe will work best for the majority of people. A large majority of these products can be found in your nearest craft stores, for example, Mod podge is notorious for its availability all across these stores, so finding the material you need should be fairly simple.
Besides the sealant of your choice, certain tools need to be purchased as well. All of these tools will greatly impact the length and level of complicity needed to finish your projects. They will ensure that you do not waste precious time cutting out vinyl decals and smoothing over the surface of it all by yourself.
Make sure that you do all the necessary research in order to find out what types of tools and sealants will work best for you. With this simple guide, we wish to provide all the information that is necessary for anyone interested in transforming their dollar store mugs and tumblers into personalized presents and pieces of art.